Following on from producing fake skies i next moved on to looking at how to create Focus Blur using photoshop. Within the camera this effect is usually produced by altering the F-stop which in turn will also effect the speed of the shot so if you don't have your tripod to hand you can find yourself limited in the amount of focus blur you can produce, luckily there is another alternative where as you take the shot and add the blur later in editing so this is what you're asked to look at in the following project.
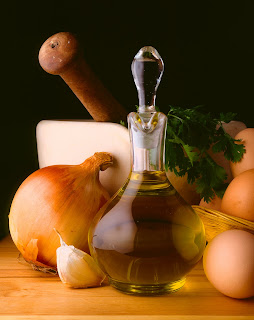
To begin with you're given the above image and told to duplicate it in layers so that you end up with 2 versions of the same image. Next you take the bottom layer and apply to it a Gaussian Blur which is found under filter>blur>gaussian blur, this is a simple filter which effects the radius of the blur and you're told to set it to around 5 pixels. Then moving back to the top layer and selecting the eraser tool i began to rub out the areas that i wanted the blur below to show through, in this case i wanted all the area behind the olive oil container to appear out of focus. Below are the results of this process and I'd have to say that it does appear just as i would imagine it would have if taken straight from the camera set to around f/5 or there abouts because the effect works that well.
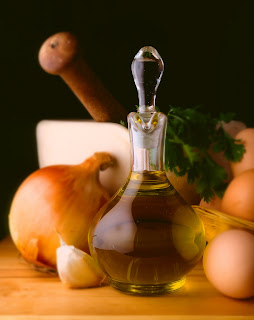
To take this process a step further I'm next asked to take the image and give it the feel of a more gradual blur, what i mean is that instead of the whole of the background begin blur at the same setting this time i blurred it in stages using two duplicate layers and the original. The image below was achieved by first taking the bottom layer and again using the gaussian blur filter but this time setting it to 10 pixels, next i selected the middle layer and this time set the filter to 5 pixels. Now i had to take the eraser tool and remove the areas which i wanted the more blurred layer below to show through, so in this case i went for the mortar and pestle and greenery. Finally working on the very top layer i used the eraser once more to remove everything but the olive oil container so that i ended up with a shot that had the feel i was looking for. If i had to chose which one of the two images I've produced i prefer I'd go for the second more gradual blurred image mainly because by using the Gaussian blur filter in this way the image feels as if it has far more depth to it then it actually has.


To put this effect into use in one of my own photos i went for this image of a heron, the reason i chose this particular shot was because of the fact i hadn't had chance to get set up with my tripod so i ended up with all the background being in focus as well as the heron and this I'm afraid rather spoiled it in my eyes (see above). Here then i have a chance to rectify this problem so using the same process as before i create two duplicate layer and then used the Gaussian filter produced the tow layer of blurring. Below is the final version and what you can see is the more heavily blurred area is in the tree roots and on the bank, then slightly less blurred is the actual river around the in focus heron. This is much closer to what i originally intended but i still think that i could have blurred the bank and tree roots a little more not completely out of focus but just enough to give it even more feeling of depth. I like this effect alot and can see that it'll be very useful in the future as a fall back option if i don't get things right for one reason or another.
 To begin with you're given the above image and told to duplicate it in layers so that you end up with 2 versions of the same image. Next you take the bottom layer and apply to it a Gaussian Blur which is found under filter>blur>gaussian blur, this is a simple filter which effects the radius of the blur and you're told to set it to around 5 pixels. Then moving back to the top layer and selecting the eraser tool i began to rub out the areas that i wanted the blur below to show through, in this case i wanted all the area behind the olive oil container to appear out of focus. Below are the results of this process and I'd have to say that it does appear just as i would imagine it would have if taken straight from the camera set to around f/5 or there abouts because the effect works that well.
  To take this process a step further I'm next asked to take the image and give it the feel of a more gradual blur, what i mean is that instead of the whole of the background begin blur at the same setting this time i blurred it in stages using two duplicate layers and the original. The image below was achieved by first taking the bottom layer and again using the gaussian blur filter but this time setting it to 10 pixels, next i selected the middle layer and this time set the filter to 5 pixels. Now i had to take the eraser tool and remove the areas which i wanted the more blurred layer below to show through, so in this case i went for the mortar and pestle and greenery. Finally working on the very top layer i used the eraser once more to remove everything but the olive oil container so that i ended up with a shot that had the feel i was looking for. If i had to chose which one of the two images I've produced i prefer I'd go for the second more gradual blurred image mainly because by using the Gaussian blur filter in this way the image feels as if it has far more depth to it then it actually has.
 To put this effect into use in one of my own photos i went for this image of a heron, the reason i chose this particular shot was because of the fact i hadn't had chance to get set up with my tripod so i ended up with all the background being in focus as well as the heron and this I'm afraid rather spoiled it in my eyes (see above). Here then i have a chance to rectify this problem so using the same process as before i create two duplicate layer and then used the Gaussian filter produced the tow layer of blurring. Below is the final version and what you can see is the more heavily blurred area is in the tree roots and on the bank, then slightly less blurred is the actual river around the in focus heron. This is much closer to what i originally intended but i still think that i could have blurred the bank and tree roots a little more not completely out of focus but just enough to give it even more feeling of depth. I like this effect alot and can see that it'll be very useful in the future as a fall back option if i don't get things right for one reason or another.
No comments:
Post a Comment