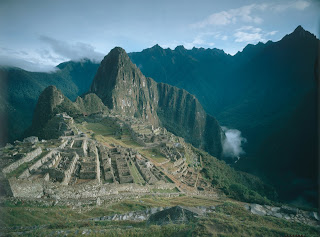
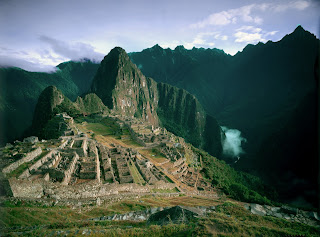
 Here we have a shot that has been taken with the light not quiet at its best resulting in the colours appearing very dull and the overall shot being a little bit of a let down, so how can this be fixed in photoshop? Well suprisingly again its a fair simple process which unfortunatley is made more difficult by the fact that some of the files that are supposed to help you are missing from the course disc (i look everywhere and couldn't locate them, maybe it's just my disc). It tells you they you should find the pre-selected areas presumable made up of the foreground, mountains in the background and the sky on the disc but there just not there so using the selection brush i made them myself. The first area to work on is the foreground, to begin with i used the Levels tool closing up the white and black points to produce a better contrast in this area. Next to give the colours the appearance of more stronger sunlight i used the Hue/Saturation tool using the setting given in the course folder (them being Hue -15 and Saturation +30), this does produce one problem which is the red path becomes very dominat so to fix this i then select Reds from the drop down menu and moved the Hue slider to -10 making it fit more closely with the rest of the colours. With this area finish its time to move on to the sky again i begin by using the Levels tool this time i close up the white point but only alter the black point very slightly because i don't want any pure dark areas in the sky as i'm trying to make the light appear brighter and stronger. Following this i moved to the Hue/Saturation tool but this time i'm only interested in the Cyans colour so selecting this from the drop down menu i can remove this particular colour cast by moving the slider to +15. The final alteration you're told to make is to the mountains in the background as the author whats them much darker to make the city on the hill top really jump out and hit you between the eyes, for this it tells you to use Enhance>Adjust Colour>Replace Colour but i found a better way for me to get the right effect was to just darken it using Brightness/Contrast as it provides the same effect in my eyes. So below you'll find the finished image is it an improvement well yes because it now appears to have been take on a much brighter day because the colours look strong and there's much more contrast and detail visible then in the original. Now the question is can a repeat the process in one of my own images?
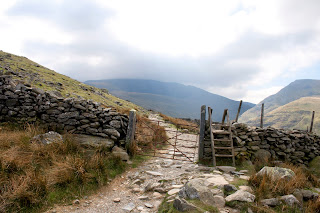
For this part of the project i have chosen the above image because it has some of the same problems as the course image in that the light being quiet dull has meant that a lot of the colour and detail has been lost from the foreground so hopefully following the same process i should now have the skills to fix it. Below is the results of my processing, to achieve this look i first selected the foreground and only used the Hue/Saturation tool to bring back the colours that had been lost, what i didn't do was go anywhere near the sky or the background, you may argue that sky could have done with the brightest areas being dulled but i like the way this looks and now with the colours more in keeping with this brightness it makes the whole shot feel right.
I could have gone for a more challenging image to alter but i felt after the previous project and with the work I'd done in this i have a pretty good grasp on how to alter the appearance of the weather and light in my landscape imagery, as i said in the last project I've taken more from this because of how it relates to my personal interest but i still agree with my original thought that i would only use this as a last resort if i wasn't able to capture the conditions i was after, with the weather in this country begin as unpredictable as ever though it might end up being more often then I'd like.


No comments:
Post a Comment